
 So you need to shorten some eyelet curtains, or ring tops as they are also known … No problem. Simply follow this step by step guide and you’ll have them done in no time.
When you shorten eyelet curtains (Ring top curtains), they need to be shortened from the bottom.
This may seem an obvious statement but some other types of curtains can, and should be, shortened from the top. When you shorten Net Curtains, it is almost always done from the top. Or, Pencil pleat Curtains – they can also be shortened from the top. Which can make the job a lot easier especially if they are lined – See our guide on How to Shorten Curtains the Easy Way for more info.
Anyway… back to this guide.
How To Shorten Eyelet Curtains:
Things you will need:
- Tape measure.
- Pins.
- Seam ripper.
- Scissors.
- Thread the colour of your Eyelet curtains.
- Thread for sewing hems on the lining fabric (usually white or cream).
- Sewing machine or Needle (if sewing by hand).
- And of course some eyelet curtains – (Ring top curtains).
Step 1 – What Length..?
First things first – when we shorten eyelet curtains, we need to know how much they need to be shortened by. If you don’t already know this measurement, here is how I would suggest getting it.
- Hang one of your eyelet curtains. Decide on a suitable finished length, and stick a pin in one edge at that point. Be sure to put the pin sideways, parallel to the floor. Please, Don’t use a marker or pen instead. If you don’t have any pins, you need to get some, your going use more later.
- Leaving the pin in place, take the curtain down and fold it in half length-ways. Now, lay it on a flat surface, align the two top corners and down the edges. Flatten out any wrinkles or lumps as you go.
- Once the edges are nice and straight, place another pin in the other edge in-line with the first pin. Then measure from the bottom corner up to the pins. Write down your measurement.
Now we know how much shorter our eyelet curtains need to be. However, we cant just cut them off at that length, we need some extra fabric allow to for the hem. Don’t worry about that for the moment.
Step 2 – Unpicking.
Unfold your curtain and spread it out nice and flat with the face fabric downwards. You should be looking at the lining fabric. If you are working on large eyelet curtains, you can get away with just the bottom half laid out flat. As long as you have at least 12-15 inches (30-40 cm) above the pins laid out flat, you’ll be fine. Now grab your seam ripper and unpick from the bottom corners, to approximately 6 inches (15cm) above the pin on both edges.
Step 3 – Creating Your New Hem.
So now that your lovely eyelet curtains are looking a little tattered and torn, you have two choices…
- Stand there looking at them and burst into tears… or
- Start giving them a nice new hem… yeay!
I’m guessing you chose option two 🙂
Ok, so with your curtain nice and flat, face fabric downwards…
- Pull the lining fabric up out of the way as far as you can, making sure not to disturb the face fabric.
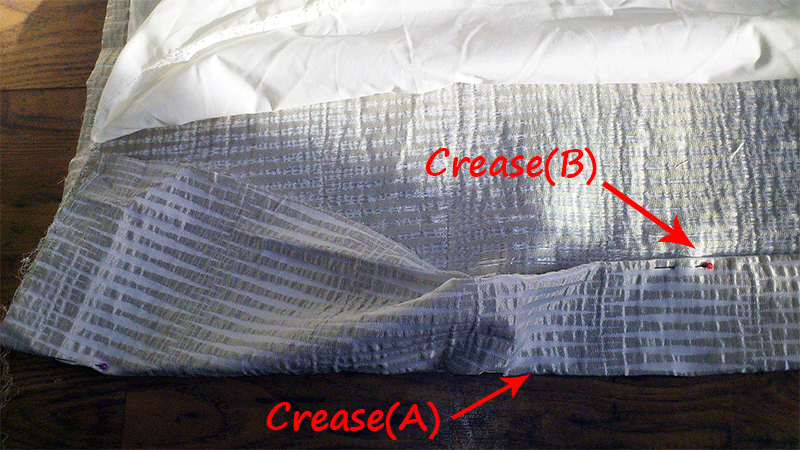
- Next, fold the face fabric up to form a nice straight crease running across from one pin to the other. Add a few more pins to keep it in place. This crease is the new bottom edge of your eyelet curtain. We’ll call it crease(A), just for fun.
- Now, measure from the new crease towards the old hem and put a pin in at the 6 inch (15 cm) mark. Do this at several points across the width of your curtain. NOTE: Be sure to only put the pins in to the top layer of fabric – they are only there as markers!!!
- Right… now, as you pick up your scissors, take a deep breath to calm your nerves. Then cut along the row of marker pins you just put in. NOT the pins along crease(A)… the ones in the second row you added. While doing this, Please take extreme care Not to cut through both layers of fabric – you should only be cutting off the excess fabric that goes to the old hem.
- Now if you didn’t do it as you cut, take out any remaining marker pins.
- Then taking the raw edge you’ve just cut, tuck it down in to crease(A) that you made earlier. Doing this will give you another new crease – Umm… crease(B) 🙂 – and finish forming your new hem. Feel free to move the pins from crease A to crease B as you go along tucking in the raw edge.
You should now have a nice new 3 inch (7.5 cm) hem, all pinned in place ready for sewing. Some people like to sew this hem now but personally, I prefer to do all the sewing at the same time – (unless I’m running short of pins, in which case I’d do it now 🙂 ). Anyway… on with the next step…
Step 4 – Sorting out the lining fabric
Creating the new hem for the lining fabric is a similar process to the one used for the face fabric.
- First, we need to turn our eyelet curtains over so that the lining fabric is on the bottom. Again, we want it laid as flat as possible with on bumps or wrinkles. With that done, you should see that your lining fabric is protruding out from underneath your face fabric. That’s fine… just the way we want it.
- This time before we move the top fabric out of the way, we need to trim the lining fabric to the required length. To do this, start with your tape measure just touching the very bottom of your new face fabric hem, and measure down 1.5 inches (3.5 cm). Add a marker pin and repeat the process across the width of your curtain.
- Now grab those trusty scissors and cut along your marker pins, removing them as you go.
- Next, fold your face fabric up out of the way, trying not to ruffle the lining fabric.
- Then fold 3 inches (7.5 cm) of your lining fabric up to form a nice neat crease and pin in place. Do this across the width of your curtain.

- Now, like we did with the face fabric, fold the cut edge down into the crease to finish forming the hem.
Step 5 – Time to start sewing
That’s right… it’s time to start sewing our new hems in to place. Now, although technically it makes no difference which new hem you sew first, I would recommend you sew the lining fabric first. Why? I hear you ask… Because if you sew your lining fabric first, you can then change the thread to match your face fabric, and finish the rest of the curtain without having to change the thread again!! – However if you sew your face fabric first, you then have to change he thread to sew your lining, then change it back to finish the rest. So with that in mind, let’s continue…
- First, sew along your new lining fabric hem removing the pins as you go.
- Next, after a quick change of thread, sew along your new face fabric hem. Again, removing the pins as you go.
- Now we need to turn our eyelet curtains inside out the best we can. The idea is to align the bottom edges back together and pin them ready to sew.

Something like this..!!
- Now sew the two layers back together following the original stitch line the best you can. Then do the same to the other edge of your curtain.
- With that out of the way… turn your curtain back in the right way and lay it out flat again, with the face fabric downwards.
- Then align the lining fabric in the centre so that both sides are equal.
- Now tuck the bottom corners of the face fabric under itself, pin and stitch in place as pictured below.

Step 6 – The next one
Ok… now for the next one…
- Move that eyelet curtain out of the way and grab your other one.
- Fold it in half length-ways. Lay it on a flat surface, align the two top corners and down the edges. Flatten out any wrinkles or lumps as you go. Just like you did with the first one.
- Dig out that measurement you wrote down and measure from the bottom corners up, and put a pin in each edge.
- Now repeat steps 2 to 5.
Step 7 – Finishing touches
- Take a sigh of relief and put the kettle on..!
- Hang your newly shortened eyelet curtains.
- Sit down with a nice cup of coco (optional) and admire your wonderful craftsmanship..!!!
- Finally… get on Facebook, Twitter or your preferred social network, and brag to all your friends about how talented you are..!!! 😉 P.S. I have no problem at all if you feel the need to share these instructions with as many people as you like. 😉 😉