
 There are several ways to make a cushion cover. Today we will take a look at how to make a cushion cover that I consider to be by far the easiest. This type of cushion cover is very similar in style to the traditional pillow case and is often called an Envelope cushion cover.
The fantastic thing about making an envelope cushion cover is that it is so simple. In fact it only takes two hems, two folds and two sewn edges to complete the finished item.
Note:
One tool frequently used in sewing is an Overlocker – In this tutorial, for the benefit of those who don’t have an Overlocker, I will show you how to make an envelope cushion cover without using one.
Things You’ll Need:
- Fabric
- Thread
- Tape Measure
- Scissors
- Pins
- Sewing Machine
- Cushion Pads / Inner
How to make an Envelope Cushion Cover without an Overlocker.
Looking at the list above, although you will need them all, the first thing we want is our cushion pads. You could manage without having it to hand, but at the very least we need to know the size. For the purpose of this tutorial, I will use the very common 17″ x 17″ (45 x 45 cm).
Once we have the size of our cushion pad, the next question to answer is – How many cushion covers will I be making? – We need to know this in order to calculate the amount of fabric we will require. For this example, lets say I’m making four.
Calculating cushion cover fabric
So we know the size of our cushion pads, and we also know how many we would like to make. Now, before we can calculate the amount of fabric we need, there is one final question – How wide is the fabric we are thinking of using.
You may already have your fabric and need to calculate how many cushion covers you can make from it. Or, maybe you are calculating how much you will need before you purchase it. If your case is the later, I highly recommend taking a look at Terry’s Fabrics, they have an excellent range at very competitive prices.
Anyway, back to the task at hand. The fabric I have chosen for my cushion covers has a width of 60″ (150 cm).
Now for the Maths… Obviously, we want to cover both sides of the cushion pad. Also, because we are making a envelope cushion cover, we need to create an overlap. I recommend at least a 6″ (15 cm) overlap. Then we need to allow for seams and a couple of hems.
To calculate for the length of fabric for one cover:
- First we need to double the width of our cushion pads.
- Next we add sufficient fabric for our overlap.
- Then we allow for two hems.
Putting that in to figures: 17 + 17 + 6 + 2 = 42″ (45 + 45 +15 + 5 = 110 cm).
So for each envelope cushion cover, we need a piece of fabric that is 42″ (110 cm) long.
To calculate for the width of fabric for one cover:
Don’t panic… this one is easy. Just take the width of your cushion pad and add the seam allowance.
Again, putting that in to figures: 17 + 1 = 18″ (45 + 2.5 = 47.5 cm).
There you go, for one cover we need a piece of fabric that is 48″ (125 cm) long and 18″ (47.5 cm) wide.
To Calculate for more cushion covers:
Now we have the size of the fabric needed for one cover, we can work out the total fabric required or all of our covers… in my case, four.
Right, my chosen fabric is 60″ (150 cm) wide. That gives me a choice of which way I want to cut the length of my covers. I could cut across the fabrics width, or I could cut down the length of the fabric.
In this case it works out slightly more economical to cut across the width as I will only need 2 metres of 60″ (150 cm) wide fabric (4 x 47.5 cm = 190 cm) for all four covers. If however, I was to cut down the length of my fabric, I could get three covers out of the width but I would need to have 2.5 metres (2 x 110 cm = 220 cm), in order to get the fourth cushion cover.
Great!… that’s all the maths out of the way. Now let’s get started with the sewing.
How to Sew Envelope Cushion Covers:
First we cut our fabric in to the appropriate size pieces as we calculated above. Once we have our fabric pieces, in my case four panels 42″ (110 cm) long and 18″ (47.5 cm) wide, we take one panel, and we are going to sew a hem at each end, across the width of our fabric.
Fold in 1/2″ (a generous cm), then fold it over again and add a few pins to anchor it. If you are making more than one envelope cushion cover, you can do this step for each panel. Then sew the hems and remove the pins.

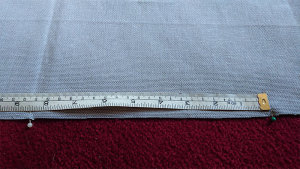
Next we need to find the middle of the length. You could measure if you like… I usually just fold my panel in half and put a pin in the crease. Do this at both ends of the crease.
Those pins represent the center of the width of your cushion pad. Now open your fabric out flat again, lay it with the face up and measure from those pins outwards towards each hem. We need to put another pin at what would be the outer edge of our cushion pad. To work out that measurement, just divide the width of your cushion pad by two. So in my case that is 17 / 2 = 8.5″ (45 / 2 = 22.5 cm).
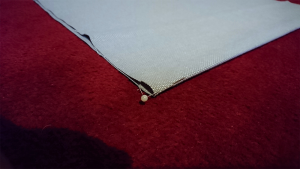
Next, with our fabric face up, remove the two center pins, and fold one hemmed end in to form a crease level with the two pins closest to it. Remove the pins and use them to hold the crease in place.

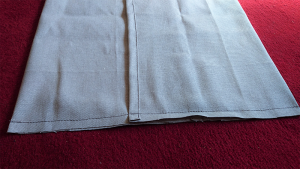
Now do the same for the other hemmed end. You should now have an overlap in the middle, that measures about 6″ (15 cm). This overlap also needs to be pin in place. Add a few pins just to anchor it ready for sewing.
Again, if you choose to, you can repeat those last few steps for each fabric panel. I like to do this because to me, it seems to make things go a little quicker.
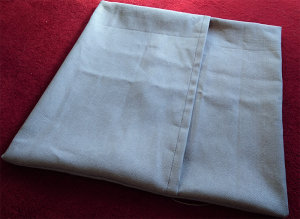
With all the panels folded and pinned, it’s time to get back on the sewing machine. So we take one of our ‘almost finished’ envelope cushion covers, and sew along both cut edges about 1/2″ in from the edge. Do this for all of your remaining ‘almost’ covers.
Yeay… Now for the final step.
Finishing Our Envelope Cushion Cover:
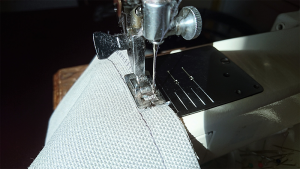
This final step is to stop the cut edges of our fabric from fraying. If you do happen to have an Overlocker then you probably know what to do now. If not, and you are intending to do a reasonable amount of sewing, it would be advisable to look in to getting one. Check out our Overlocker Guide for more info.
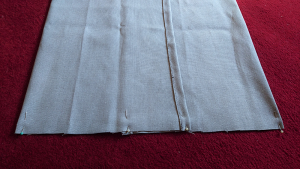
For those of you that don’t already own an Overlocker, there is a workaround we can do to stop the edges of our covers from fraying too much.
Set your sewing machine to zigzag stitch. Now, for each cushion cover, sew a zigzag stitch along each cut edge, somewhere between the cut edge and your previous stitching. In the following photo, I have done this in a contrasting colour thread so that it stands out.
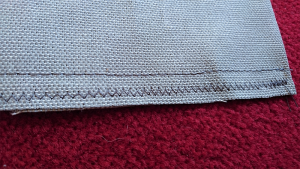
As a little tip, line up your row of straight stitches with the edge of your pressure foot and use the straight stitch as a guide.
Taddaa… Congratulations, you’ve done it!… all that’s left now is to turn them in the right way, and stuff them with your cushion pads.
Thank you, really easy to follow instructions, and they work! I have been making curtains ans cushions for many years; I wish I had found this site then–lots of very useful tips. I fully recommend this site.
Thank you so much for this great tutorial! I had made a few cushion covers using a different method where the three pieces (front and overlapping back parts) were cut and sewn separately but your method is so much more elegant! I loved how the prep work all paid off when the seams were just two very simple straight edges and zig-zag finishes. My cushion covers are looking great!
No problem Patrick, I’m so glad you found our tutorial useful and congrats on completing your new cushion covers.