What is an Overlocker? – Overlocker Machines Explained

What does an overlocker do?

Toyota-SL3335-Overlocker

In a nutshell, an overlocker is a sewing machine that stitches with either 3, 4 or 5 threads at the same time. They are mainly used to join seams, trim off the excess fabric and stop the cut edges from fraying all in one simple operation.

Pictured to the right is a Toyota SL3335 Overlocker
. read more

Cheap sewing machines – A good thing or bad?

Cheap sewing machines - break down - wereinstitches.co.uk

I have recently been approached by a few people asking if I knew anywhere that sells cheap sewing machines. I can’t help but ask what they mean by ‘cheap’. As you know, everybody has their own idea of the term ‘cheap’. An amount that is considered cheap to one, may be thought of as expensive to another. read more

Best Beginner Sewing Machine – Our Sewing machine for beginners guide

Janome-525S - Recommended for best beginner sewing machine

The best beginner sewing machine, in our opinion, would be a sewing machine that is not overly complicated. By that I mean a sewing machine that doesn’t necessarily have hundreds of bells and whistles. Like the Brother Innov Is NV550SE for example. – A computerized sewing machine with 429 utility and decorative stitches, 3 lettering styles etc.  read more

How To Sew

How to sew?… That is a good question! However, I’m afraid I need a little more information like – How to sew what? – I mean, lets face it, there are a lot of things to choose from and i’m hoping you don’t mean seeds. Also, do you want to learn to sew by hand, or using a sewing machine?

To be honest, personally, I love my sewing machine. I don’t mind the odd bit of sewing by hand, but it’s definitely a case of the less the better. Maybe it’s because I’m not very quick at hand sewing, or because I have an awful habit of jabbing myself with the needle.

How to Sew – Learn to Sew with a Sewing Machine

Obviously there are some things that need sewing by hand like hemming trousers and skirts. Unless that is, you happen to have a Blind Hemming Machine. That would be a subject for another time though.

Learning how to sew with a sewing machine (a standard one), is relatively easy. The vast majority of things can be made this way,and it really isn’t all that complicate.

Sewing – The First Things You Need to Know

Some of these are obvious, some maybe not so much. The first thing is that the most common stitch by far, is the straight stitch. This type of stitch is used on literally everything made through the craft of sewing.

The second most common stitch, would be the zigzag stitch. For example, around the edge of the faithful old buttonhole, look closely, and you will see a compact form of zigzag stitch. They also appear in combination with the straight stitch, to create the Overlocker stitch

When you want to learn how to sew, it may seem rather daunting. Fear not though, it’s really not all that complicated. Just take a look at any of the fabric items around you. I can pretty much guarantee that they will be made up of just two things – Seams and Hems.

Seams:

These are were two (or more) pieces of fabric join together.

Hems:

These are found at the edges and formed by folding and stitching the fabric in place, to form a neat edge.

So there you are. Putting those few things together gets you well on your way in your quest to learn how to sew.

Sewing Tutorials

Here at We’re in stitches, to help you further along your way, we have put together some easy sewing projects. They will show you step by step how to sew a range of soft-furnishings including pillow cases, cushion covers and curtains. So be sure to check them out!


Laundry Symbols – UK Washing Symbols Explained

What are Washing Symbols…?

Washing symbols explainedWashing symbols, or Laundry symbols as they are also known, are pictograms found on tags attached to almost every item made of fabric. Clothing, curtains, cushion covers and bedding all have these labels. Even leather items like jackets and trousers carry these laundry symbols. Possible exceptions would be things like bags or shoes. These washing symbols are there to show you the best way to handle the laundry process for that particular item.

//

Yes… But what do the symbols mean?

Well, that would depend on where you live.

Washing symbols vary in different regions of the world. In this section we’ll concentrate on those used in the UK and Europe.

Basic Laundry Symbols

Laundry Symbol for Machine WashableWashing Symbol for BleachLaundry Symbol for Drying MethodLaundry Symbol for Dry-CleanLaundry Symbol for Iron

In the UK and Europe there are five different types of laundry symbol used. The basic shapes of these are shown above. However, each symbol has a different version depending on the laundry process required for that peticular item.

The list below contains the most common washing symbols found, along with a breif discription of their meaning.

Washing Symbols

Washing symbol for Machine Washable This washing symbol means the item is machine washable.

Washing symbol for Maximum Wash Temperature Machine washable ~ Maximum wash temperature 40 degrees centigrade. (may be higher or lower than 40°c.)

Washing symbol for Machine Washable on Synthetic Cycle1 bar below – Machine washable ~ Wash on a synthetic cycle.

Washing symbol for Machine washable ~ Requires delicate wash cycle2 bars below – Machine washable ~ Requires delicate wash cycle.

Washing symbol for Hand Wash at Warm TemperatureItem should be Hand Washed at a warm temperature.

Washing symbol for DO NOT wash with water ~ Dry Clean OnlyNot to be washed with water.(requires Dry-cleaning).

 Washing Symbols for Bleach

Washing symbol for Bleach in wash is acceptableThe use of bleach in the wash is acceptable.

Washing symbol for use of Chlorine Bleach is acceptableThe use of chlorine bleach is acceptable.

Washing symbol for DO NOT use BleachDO NOT use bleach.

Drying Symbols

Laundry symbol for Item can be Tumble driedItems showing this symbol can be tumble dried.

Laundry symbol for Tumble dry on a Low heat setting onlyTumble dry on a Low heat setting only.

Laundry symbol for Tumble dry on a Medium heat setting onlyTumble dry on a Medium heat setting only.

Laundry symbol for DO NOT tumble dryDO NOT tumble dry items with this symbol.

Laundry symbol for Drip drying is recommendedDrip drying is recommended for this item.

Laundry symbol for Line drying or Hanging is recommendedItem requires Line drying or Hanging.

Laundry symbol for Lay items flat to dryFor items with this laundry symbol it is recommended that you lay them flat to dry.

Ironing Symbols

Laundry symbol for Cool Iron ~ 1 dot - upto 110°c1 dot – Cool Iron. (upto 110°c) –  Generally used for acrylics, acetates and nylons.

Laundry symbol for Warm Iron ~ 1 dot - upto 150°c2 dots – Warm Iron. (upto 150°c) –  Generally used for polyester mixes, and wool.

Laundry symbol for Hot Iron ~ 1 dot - upto 200°c3 dots – Hot Iron. (upto 200°c) –  Generally used for linens and cottons.

Laundry symbol for DO NOT IronDO NOT Iron items with this symbol. Ironing may cause serious damage to the fabric. E.g. Melt it!

Dry-Cleaning Symbols

Laundry symbol for Item is suitable for Dry-CleaningItem is suitable for Dry-Cleaning.

Laundry symbol for Any solvent may be used during dry-cleaningThe ‘A’ symbol indicates that Any solvent may be used during the dry-cleaning process.

Laundry symbol for Solvents R113 & Hydrocarbon should be used for Dry CleaningAn ‘F’ indicates that solvents R113 & Hydrocarbon should be used for dry cleaning.

Laundry symbol for Any solvent except trichloroethylene may be used for Dry CleaningThe ‘P’ indicates that any solvent except trichloroethylene may be used.

Laundry symbol for DO NOT Dry-cleanDO NOT Dry-clean items with this symbol. The solvents used during the dry claening process may cause damage to the fabric.

Measure for Curtains with our Step by Step Guide

Measuring for curtains is a simple task, but only if you know how. Our step by step guide will show you how to get all the appropriate measurements correctly. We have also included tips, advice and things to consider when you measure for curtains. E.g. the amount of ‘gather’ you want.

How to Measure for curtains:

Tips:

  • You should select and fit your track or pole (or curtain wire for nets), before taking any measurements for the length of your curtains. (You may not always be able to fit your track or pole, the exact height you would like. e.g. when trying to drill into a concrete lintel).
  • When you measure for curtains, always use a steel tape to take your measurements. (fabric or plastic type tape-measures tend to stretch over time and may give a false reading).
  • Every measurement you take, WRITE IT DOWN. 😉

Step 1: Measure for a New Curtain Pole or Track

(Please skip this step if there is an existing pole or track you intend to use.)

First we need to measure the inside width of the window recess. (Measure A)

Next, decide how far your curtains will over-hang the wall, each side of the window. This would normally be around 20cm (8 inches) each side and enables the curtains to open wider, allowing more daylight to enter the room. (Measure B)

Measure for Curtains pole or Track

Now add A + B + B. This will give us the length of the track or pole needed (C), excluding finals.

Step 2: Measure for Curtains Width

(If you skipped step 1, measure your track/pole (excluding finals), this will give you measurement (C).)

Measure for curtains width

When you measure for curtains width, it is important to consider the ‘gather’.

To have curtains with a medium gather when closed, we take our track/pole measurement (C), multiply it by 1.5 then divide by 2. The result is the required width of Each curtain.

For curtains with full/normal gather when closed, measurement C would be the required width of Each curtain.

If you desire a heavy gather, multiply measurement C by 2.5 then divide by 2. Again, the result is the required width of Each curtain.

Ok, we’ve now established the width of our curtains. Here’s how we work out the length.

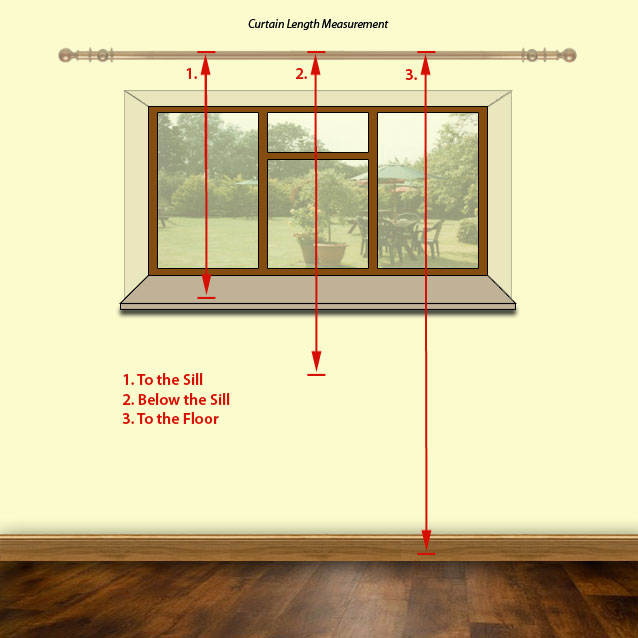
Step 3: Measure for Curtains Drop / Length

Before we can measure for curtains length, we need to decide whether our curtains will fall to the sill, below the sill or to the floor.

Measure for Curtain length


– Sill length curtains usually finish 1/2 inch (1.25cm) above the sill.

– Curtains that fall below the sill usually finish 15cm (6 inches) below. This, of course, can be adjusted for personal preference.

– For floor length curtains you should allow 1 inch (2.5cm) clearance to avoid dragging.

(Click Image to Enlarge)


Now, with your track/pole fitted 6-8 inches (15-20cm) above the window recess, measure from the top edge of the track/pole to your chosen finished length.

  • For Tab-top and all types of pleated curtains, write down your measurement.
  • For Eyelet/Ring top curtains, write down your measurement and add 1.5 inches (3.5cm) (This is the distance from the inner edge of the eyelet to the top edge of the curtain).

Step 4: Important!

Sit down and relax with your favourite beverage!

Well… maybe you could put away your step ladder and tape first… I’ll leave that up to you.

Measuring for Ready Made Curtains

When you measure for curtains, and intend to buy ready made curtains, there are a few things to consider.

  • Ready made curtains are only available in certain sizes.
  • You may need to get them shortened which will add to the over-all cost.
  • The sizes quoted on the packaging are approximate measurements, NOT exact.
  • The quality of the fabric can often be rather poor. Especially when buying at greatly reduced prices.

Here is a list of the more common sizes available. The first number given is always the width. So curtains that are 117x137cm would have a width of 117cm, and a length of 137cm. Please remember when buying ready made curtains, the sizes given are approximate.

Standard Ready Made Curtain Sizes: read more